Category: Uncategorized

Uncategorized

The Physics of Filming Underwater (And Why Lens Choice Matters)

Filming underwater is one of the most technically challenging environments in cinematography. The moment a camera enters the water, the physics that shape the image change dramatically.

Light bends, colors disappear, pressure increases, and movement becomes slower due to water resistance. These forces influence everything from how a scene looks on camera to what lenses filmmakers should use.

Understanding the physics behind underwater filming allows cinematographers to adapt their gear and capture clearer, more cinematic footage beneath the surface.

Refraction: Why Underwater Images Look Different

One of the most noticeable physical effects underwater is refraction.

Refraction occurs when light travels between two mediums with different densities. When light moves from air into water, it bends because water is denser.

This bending alters how objects appear on camera:
– Subjects appear closer than they actually are
– The field of view becomes narrower
– Straight lines may appear slightly distorted

Underwater housings often use dome ports to correct these distortions. Dome ports restore the natural field of view of wide lenses and help preserve image quality.

Flat ports, on the other hand, magnify the image slightly and are often used for macro photography.

Color Absorption: Why Reds Disappear

Water absorbs different wavelengths of light at different depths.

The deeper a camera goes, the more colors are lost.

The order of color loss generally follows this pattern:
– Red disappears first
– Orange and yellow fade next
– Green and blue travel the farthest

This is why underwater footage often appears overwhelmingly blue or green.

To compensate, underwater cinematographers use artificial lights, red filters, and manual white balance adjustments to restore the colors that water naturally removes.

Pressure: The Deeper You Go, The Stronger It Gets

Pressure increases rapidly underwater. For every 10 meters (33 feet) of depth, the surrounding pressure increases by roughly one additional atmosphere.

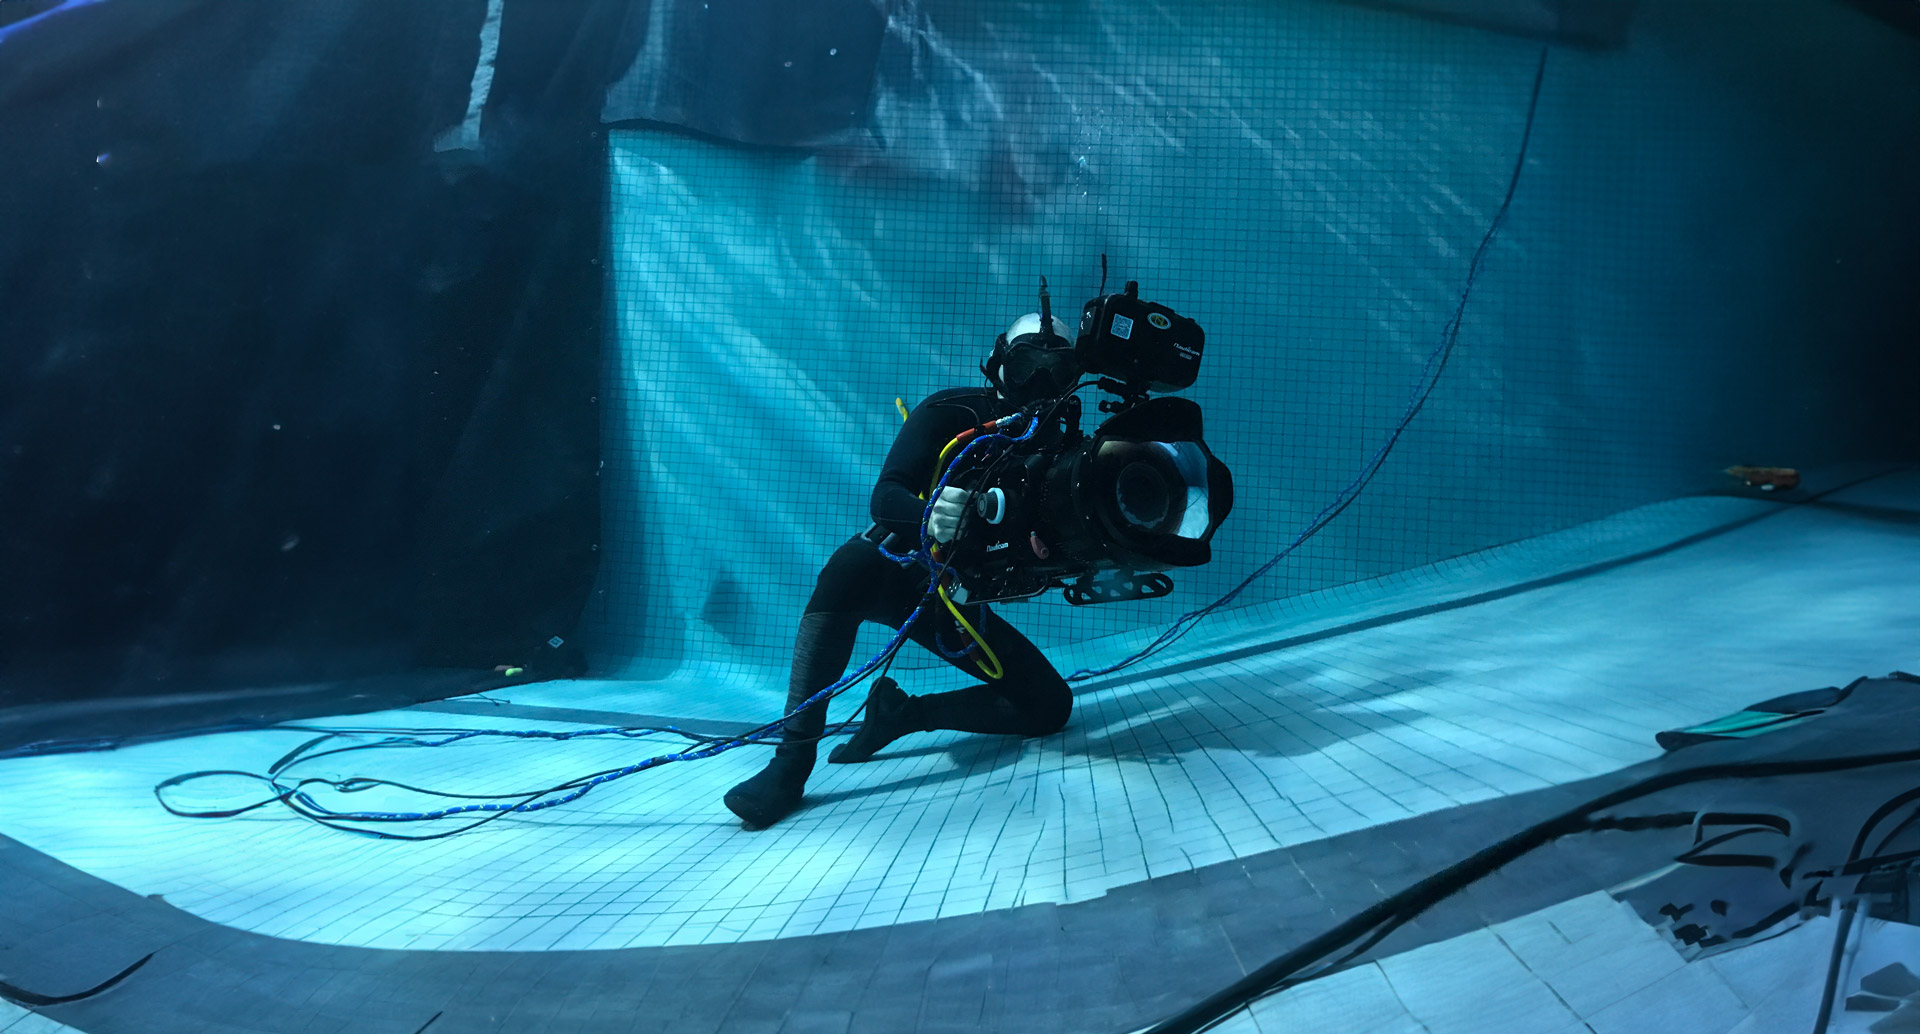
Underwater camera housings must be built to withstand these forces without leaking or deforming. Professional housings are typically made from aluminum or reinforced materials and sealed using O-rings.

Even the smallest seal failure can allow water to enter and damage camera equipment.

Drag: Why Underwater Movement Feels Slow

Water is far denser than air. Because of this, any object moving through water experiences much greater resistance, known as drag.

For filmmakers, this affects how cameras move through the water.

Large camera rigs experience greater drag, which makes fast movements difficult. Instead, underwater shots often appear smooth and slow, creating fluid and controlled motion.

Visibility and Particle Scattering

Unlike air, water is filled with particles such as sand, plankton, and organic matter.

When light hits these particles, it scatters. This scattering can cause a visual effect called backscatter, where particles appear as bright floating specks in footage.

To reduce backscatter, underwater cinematographers typically place their lights at an angle rather than directly beside the camera lens.

The Physics Behind Choosing the Right Lens Underwater

Lens selection underwater isn’t just a creative choice — it’s largely dictated by physics.

Water reduces contrast, clarity, and color over distance. The farther a subject is from the camera, the more water interferes with the image.

This is why underwater filmmakers rely heavily on wide-angle lenses. Wide lenses allow the camera to get physically closer to the subject while still capturing a large environment, reducing the amount of water between the camera and the subject.

Wide-Angle Lenses

Wide lenses are ideal for filming coral reefs, shipwrecks, divers, large marine animals, and underwater environments.

These lenses are often paired with dome ports, which help maintain their wide field of view by correcting the refraction caused by water.

Fisheye Lenses

Fisheye lenses are even wider than traditional wide-angle lenses and create an extremely large field of view with a curved perspective.

Underwater cinematographers use fisheye lenses when they want to capture dramatic environments while staying extremely close to the subject, minimizing the amount of water between the lens and the subject.

Macro Lenses

Macro lenses are used for filming small marine life and detailed textures.

These lenses work well with flat ports, which slightly magnify the image and help capture fine details. However, macro filming requires precise focus and careful lighting because the depth of field becomes extremely shallow.

Why Telephoto Lenses Rarely Work Underwater

Telephoto lenses are useful on land when subjects are far away, but underwater they are rarely practical.

Because water reduces clarity and contrast quickly, filming from far away results in hazy footage filled with particles and color loss.

For this reason, underwater cinematographers usually follow one simple principle: get close to the subject.

Where Science Meets Cinematography

Underwater filmmaking sits at the intersection of physics and visual storytelling.

Every shot is shaped by the environment: light bending through water, colors disappearing with depth, pressure affecting equipment, water resistance shaping camera movement, and lens choices compensating for optical changes.

By understanding these physical principles, filmmakers can adapt their techniques and equipment to capture the stunning visuals hidden beneath the surface.


Uncategorized

Underwater Production: Control vs. Authenticity

Studio Tank vs. Real Location: Choosing the Right Water Setup for Your Shoot

When a production calls for underwater or water-based scenes, one of the biggest decisions is whether to shoot in a studio tank or on a real-world location like the ocean, lake, or natural pool. Each option brings creative advantages and logistical challenges, but for many productions, the choice often comes down to three key factors: control, safety, and visual consistency—including technical considerations like achieving clean pool blacks.

The Power of a Controlled Environment

A studio tank offers something every production values: predictability.

Inside a controlled facility, filmmakers can manage nearly every variable, lighting, water clarity, temperature, weather, and shooting schedule. There’s no waiting for the perfect sunlight, no sudden storms, and no unexpected environmental changes. This allows directors and cinematographers to:

  • Precisely shape lighting setups
  • Maintain consistent continuity across takes
  • Rehearse complex camera or stunt movements safely
  • Capture multiple angles without environmental resets

In contrast, real locations introduce variables that can enhance realism but complicate production. Changing tides, shifting sunlight, wind, or murky water can quickly derail a carefully planned shoot. While natural locations provide authenticity, they often demand flexibility in scheduling and shot design.

Safety Comes First

Water shoots always carry risks, and professional safety teams are essential in both studio tanks and natural locations.

Studio tanks are designed with built-in safety advantages such as controlled depths, clear visibility, temperature regulation, and easy equipment access. These features help safety divers and crew respond quickly and maintain close supervision throughout the shoot.

However, it’s important to note that safety divers and trained water personnel are just as important, and often required, on natural water sets as well. Oceans, lakes, and rivers typically involve additional risks like currents, uneven terrain, or limited visibility, making experienced safety supervision critical regardless of where filming takes place.

Whether in a tank or on location, proper planning, certified safety divers, and clear emergency protocols should always be treated as non-negotiable parts of any water production.

Achieving Clean “Black Pools”

One technical advantage of studio tanks is the ability to achieve true Black Pools, the deep, clean black backgrounds often used to create the illusion of endless depth or open water.

In a controlled tank setup:

  • Walls and floors can be painted or draped in black
  • Lighting can be tightly shaped to eliminate spill
  • Water clarity can be maintained for crisp contrast
  • Reflections can be minimized with controlled angles and surfaces

This makes it much easier to isolate subjects, composite backgrounds, or create stylized underwater looks. Achieving the same effect in a natural location is far more difficult due to ambient light, particulate matter, and unpredictable reflections.

When a Real Location Makes Sense

Despite the advantages of studio tanks, real locations still have their place.

Natural environments can provide:

  • Authentic textures and landscapes
  • Realistic wave movement and light refraction
  • Larger-scale environments without tank size limitations
  • Unique visual storytelling opportunities

For wide scenic shots or moments where authenticity outweighs technical control, shooting on location may be worth the additional logistical challenges.

Finding the Right Balance

Many productions ultimately use both approaches:

  • Studio tank for close-ups, dialogue, stunts, and controlled underwater work
  • Real location for wide shots and environmental establishing scenes

By combining the safety and precision of a tank with the visual richness of real-world environments, filmmakers can achieve the best of both worlds.

Final Thoughts

Choosing between a studio tank and a real location isn’t just a technical decision, it’s a creative and practical one. If your priority is control, safety, and consistent visual quality, especially when clean pool blacks are required, a studio tank may be the ideal solution. If your story demands natural scale and environmental realism, a real location can deliver unmatched authenticity.

Understanding the strengths of each option, and ensuring proper safety personnel are in place in any water environment, helps keep your shoot safe, efficient, and visually compelling from the first setup to the final frame.

If you have any questions or concerns, please don’t hesitate to reach out for professional services or further assistance. We are here to help your vision come to life:

Website: airsealand.com
Telephone: +1 (718) 626-2646
Email: rentals@airsealand.com


Uncategorized

Flat vs. Dome Lens Ports: What’s the Difference?

When shooting underwater, the type of lens port used on your camera housing has a major impact on image quality. The two most common options — flat ports and dome ports — behave very differently once submerged due to how light refracts underwater.

Flat Lens Ports

Flat ports use a simple, flat piece of glass placed in front of the lens. While they are straightforward, durable, and often more affordable, flat ports significantly alter how light behaves underwater.

As light travels from water to glass to air, it bends, a phenomenon known as refraction. This causes images shot through a flat port to appear magnified, similar to looking through a dive mask. The result is a reduction in the lens’s field of view by roughly 25%, along with increased edge softness, distortion, and potential color fringing when using wider lenses.

Why flat ports still matter:
This magnification can actually be beneficial for macro and close-up photography, allowing small subjects to fill the frame more easily.

Flat ports are best suited for macro, close-focus work, and scenarios where above-water framing or split-level composition isn’t a priority.

Dome Lens Ports

Dome ports feature a curved optical surface specifically designed to counteract underwater refraction. This curvature allows light rays to enter the housing more naturally, helping the lens retain its intended field of view and reducing distortion.

A key characteristic of dome ports is that they create a virtual image underwater. Instead of focusing on the subject itself, the lens focuses on a virtual image that appears closer than the actual scene. Because of this, proper lens selection, aperture choice, and focus calibration are critical for achieving sharp results.

Pro tip:
Stopping down your aperture (e.g. f/8–f/11) helps improve corner sharpness when shooting wide-angle scenes with dome ports.

When used correctly, dome ports deliver sharper edges, wider coverage, and more natural-looking images. They are the preferred choice for wide-angle photography, cinematic underwater footage, reefscapes, wrecks, and clean over-under (split) shots.

Flat Port vs Dome Port

Feature Flat Port Dome Port
Field of View Reduced (~25%) Maintains original lens FOV
Best For Macro & close-ups Wide-angle & cinematic shots
Edge Sharpness Limited with wide lenses Excellent when configured correctly
Over-Under Shots Not ideal Preferred option

Choosing the Right Port

If your work focuses on macro subjects or fine detail, a flat port is often the better and simpler choice. For expansive underwater scenes, wide-angle compositions, and professional-level image quality, a dome port offers superior optical performance.

Choosing the correct lens port ensures you’re getting the most out of your camera system, and capturing the clearest, most natural underwater images possible.


About

From concept to completion, Air Sea Land is the largest production and rental house for Professional Underwater camera gear and Jimmy Jib rentals in the North East, US.

Learn more:

To begin your Rental Process

Learn more about our rental options and professional camera services

View Rental Process and Documents

Tel: 718-626-2646

Insurance

Insure My Equipment is your online portal for production equipment insurance. Instantly and securely purchase policies to cover rented equipment.